Getting your focus right is critical to achieving a sharp image. Guidance such as "focus 1/3 in" can be helpful or just plain confusing, and the maths and physics explaining how focus works can be pretty complex and daunting!
As such it often seems easier to just leave auto-focus on and focus on the main subject. Sometimes this will work, but often it will have you using an inappropriate aperture or leave you feeling frustrated with the results.
Guides about focus are plentiful on the Internet, but I thought I'd write my own for anyone that's struggling to make sense of it all.
This post will start with some concepts that will hopefully help your immediate understanding. To keep the word count down I'll follow-up with another post to help with practical applications and focusing technique.
I started writing this post using words and numbers and it quickly became very confusing even for me writing it! So I've put together a number of diagrams that I hope will show the principles a little more clearly.
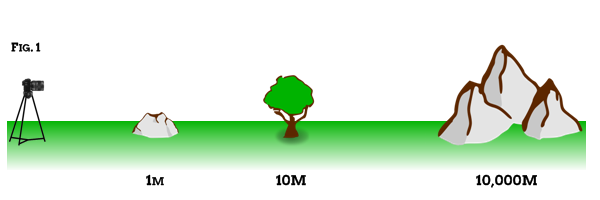
With that said let me present you with a side on view of the "landscape" we'll use in our discussion:
In case you're wondering, that's a rock at 1m - I shoot a lot of rocks! :)
Plane of Focus
Your camera is focused on a "plane" - an imaginary sliver of space at a given distance from the camera that runs parallel to the front of the lens. If your camera is horizontal, at some point in front of the camera there is a vertical plane and everything in line with that plane is "in focus". By moving the plane of focus we determine what part of the scene is in focus.
Something to consider here is that you aren't actually focusing on something. Although the auto-focus system in the camera needs something visible to lock onto it's simply setting the focal plane to the position of that object. This may seem obvious or pointless to highlight but for me realising that "focus" was just a point in space rather than a physical object was a big step forward in my understanding. So in a sense objects are "reference points" to quickly get to a particular focus distance.
Depth of Field
Technically only objects that are completely in line with this plane are "in focus", and only completely flat objects at that! Everything else is out of focus. In fact, almost everything in a picture is out of focus.
However the extent to which something is out of focus is determined by a number of factors. Chief amongst these is the distance from the focal plane. As you move further from the plane of focus, either forwards or backwards, sharpness steadily reduces.
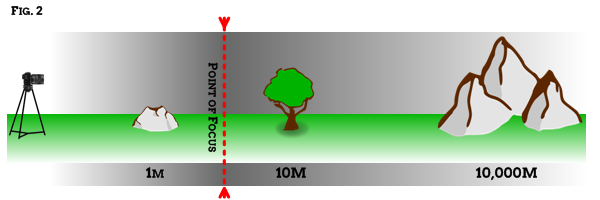
Looking at Fig.2 the grey gradient represents "sharpness", showing how it gradually increases (darker) towards the point of focus, and then decreases beyond it (lighter). Note how there is no sudden loss of sharpness, it's (literally) shades of grey over a a particular distance.
"Depth of field" represents the region from in front of the plane, to beyond the plane where this sharpness is reduced but still "acceptably sharp". By this we mean that our eyes still perceive it as sharp. In other words the out of focus blurriness can't be seen by the naked eye.
By setting the plane of focus appropriately, we can determine which objects will fit within this "depth of field" to make them sharp in the final picture. Fig.3 below shows where our near and far limit for "acceptable sharpness" lie. The red shaded area between these lines represents our "depth of field".
A number of factors determine what "acceptably sharp" is, most significantly the quality of our eyesight and the size of the final print. An object with a slight blur in an A3 print may appear completely sharp in a 6x4 print. We don't have to worry too much about the details, when we talk about Depth of Field calculators in a minute they've already got standard "acceptability" factored in.
The fact that depth of field extends in front of the point of focus as well as behind it is the source of the "focus 1/3 in" guidance. If you focus on the closest object of interest, then the front portion of your depth of field is "wasted" on things you don't care about and you may be using an unnecessarily high aperture to compensate for lack of sharpness in the far distance.
Depth of Field Calculators
Before going further this whole depth of field thing is pretty mathematical. Fortunately there are tools out there called Depth of Field calculators that take the hardwork/guesswork out of figuring out what depth of field we get. I personally use DOFMaster (http://www.dofmaster.com) on my iPhone and I used it for the calculations in the diagrams below, avoiding the need for maths in this post.
It's worth having a look at such a calculator and having a play to understand how the below factors affect the depth of field of your lenses. Some people print the tables out and take them with them. As I mostly use prime (fixed focal length) lenses and use certain apertures commonly, my most used calculations are etched into my brain. And for those that aren't I rely on my iPhone!
Factors Affecting Depth of Field
Hopefully it's clear that we have a "zone" of sharpness around the point that we focus on that we call "depth of field". The big question then is, how big is that depth of field and how do I use it. This is where the interesting stuff kicks in.
Lots of diagrams follow where I'll explain the various factors that influence this depth of field. This understanding is important so that we know what tools we have at our disposal to optimise sharpness in our image (or, perhaps minimise sharpness - not all photos need to be sharp front to back).
Let me start by showing a single diagram as a starting point to get a feel for how these things are going to work.

Fig.4 is showing us what depth of field we'll get with a 35mm lens on a full frame camera (i.e. my Canon 5D Mark 2), using an aperture of f/11 and focused at 2m. The near limit of sharpness is 1.29m, which means that the rock at 1m is going to be out of focus and so blurry. How blurry, or if we care, is a separate matter.
Similarly the far limit is 4.39m and so the tree and the mountains are also out of focus. Again, how blurry or how much we care is irrelevant for now. We're just going to talk through how we move the depth of field and how this brings these objects in and out of focus (again this is really in and out of "acceptable sharpness").
Aperture
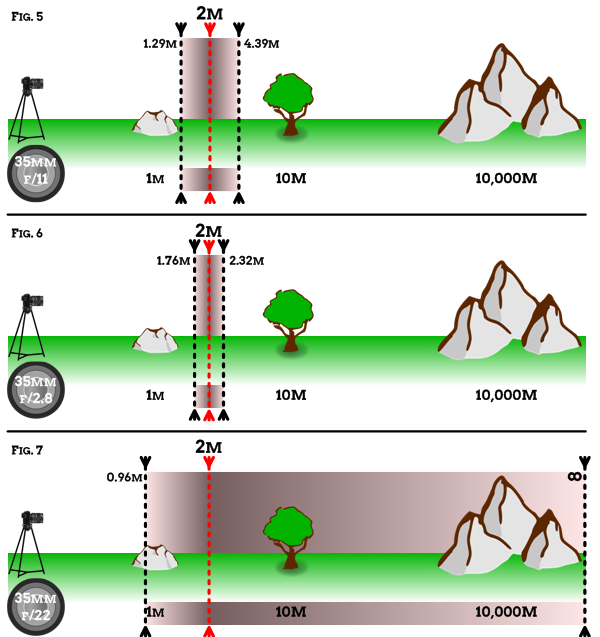
The most obvious and well understood tool we have at our disposal to adjust depth of field is our lens aperture. A wide aperture (small f number, e.g f/2.8) gives less depth of field than a narrow aperture (large f number, e.g. f/16). The following figures show how DOF varies across a selection of apertures.
Note that at f/22 we have a depth of field that stretches to "infinity", the mathematical symbol for which is the "lying down 8". By infinity we mean as far as the eye can see.
Focus Distance aka Subject Distance
It's often said that subject distance is a factor in determining how much depth of field you get. As noted above we're not always focusing on 'something' and our actual subject could be somewhere else in the landscape.
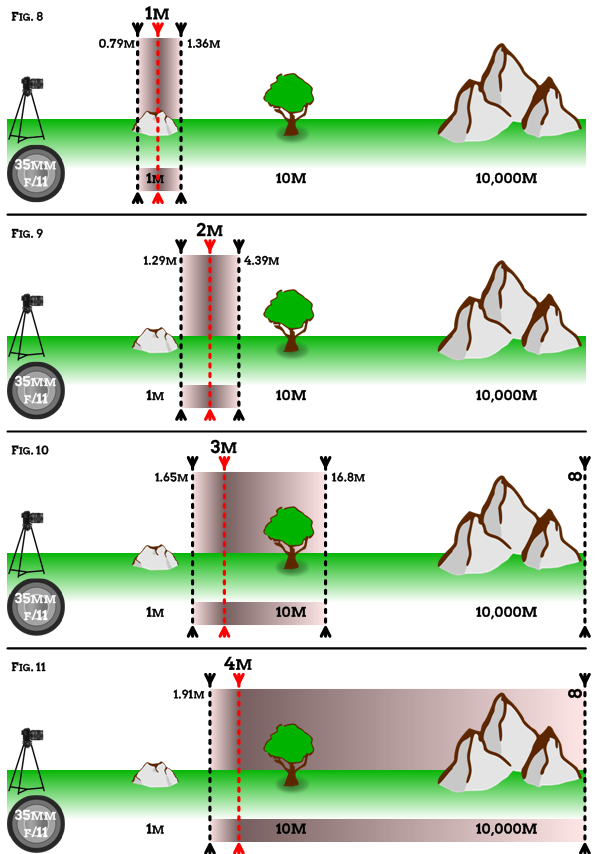
Semantics aside the point remains, how far the focus point is from the lens affects the depth of field. As you'll see from the diagrams below the closer the focus point is to the lens then the shallower the depth of field will be.
Note that as the focus point moves from 3m to 4m the far limit moves out to infinity. We'll come back to this point in a moment.
Focal Length
The final factor in determining DoF is the focal length of the lens in use. A wider angle (fewer mm) will provide more depth of field than a longer focal length (more mm) as the following diagrams show.
It is perhaps too much of a simplification to only demonstrate the change in DOF from changing through focal lengths.
When we change focal length then of course the framing of our image changes. Rather than standing in one spot changing focal length (a well accepted bad habit!) we would expect to move our position to maintain a similar frame. For example when we switch from 50mm to 24mm, we would expect to move from 3m away to about 1.5m to maintain a similar (ish) image. If we do this then, as noted above, the change of subject distance that accompanies the change in focal length also has an impact on the DOF.
Hyperfocal Distance
Lets return to the effect we saw as we moved our focus distance from 3m to 4m above.
For a given focal length and aperture there is a focus distance that provides the widest possible depth of field. This is called the "Hyperfocal Distance". It is basically the closest focus point to the lens where the far limit is infinity, giving us total depth of field from this point to infinity. Moving beyond the hyperfocal distance continues to increase the near limit but the far limit is always infinity, so the overall depth of field reduces.
As you'll see a focus distance of 3m gives us a far limit of 16.8m. As we move towards 4m both the near limit and the far limit get further away until we reach a point at 3.65m where the far limit becomes infinity. This is our hyperfocal distance.
This gives us a depth of field extending from 1.82m to infinity and represents the maximum depth of field this aperture/focal length combination can deliver. If we maintain this focus distance/aperture/focal length combination then we know that for any shot everything 1.82m and more from the lens will be "in focus". Nice!
Going Beyond the Hyperfocal Distance
As you will have noticed from the above diagram, going from the hyperfocal distance of 3.65m to 4m maintains a far limit of infinity, and only loses 9cm from the near limit. In other words at 35cm beyond the hyperfocal distance we only have 9cm less depth of field.
Let's look at some other points around the hyperfocal distance.
What we can see is that before the hyperfocal distance, increasing the focus distance has a large effect on increasing the depth of field mostly with respect to the far limit. Comparing 3.5m to 3.65m we only gain 3cm of near limit but the far limit goes from 87.6m to infinity. Being short of the hyperfocal distance greatly reduces overall depth of field.
By contrast when we are beyond the hyperfocal distance we maintain our far limit of infinity and only lose depth of field from our near limit. Even then the near limit increases relatively slowly. From 3.65m to 3.8m we only lose 4cm from the near limit. In practical application the depth of field is equivalent.
Even going way above our hyperfocal distance to 10m still gives remarkably wide DOF only losing 84cm from the near limit of the HD.
The conclusion is that if we can't be exact with the hyperfocal distance it's better to go past it than to fall before it.
As a side note, the near limit at the hyperfocal distance is exactly half the hyperfocal distance.
Getting Our Example Landscape Sharp
Now that we've looked at factors affecting depth of field, let's take a last look at our example landscape with respect to getting everything from the foreground rock, to the midground tree to the background mountains sharply in focus.
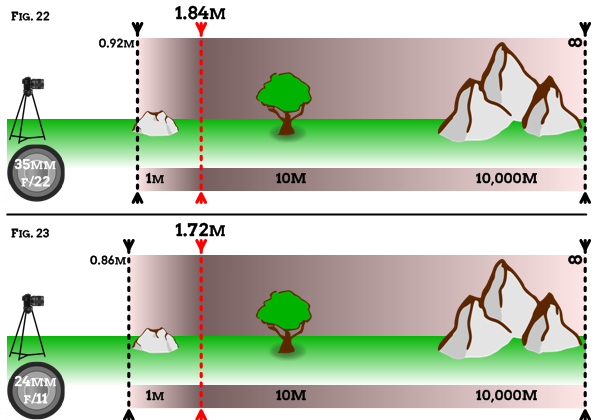
Looking at the hyperfocal distances for a 35mm lens through f/11 (3.64m), f/16 (1.29m) and f/22 (1.84m) I can recognise that it is only f/22 that will give me the near limit I need to get the near rock in focus.
However most lenses are at their sharpest within a range of about f/5.6 to f/11. The optimal aperture varies from lens to lens but generally we'd want to avoid going above f/11.
Beyond f/11 lens performance decreases and an effect called "diffraction" comes into play that adds a degree of blur image-wide. This was one of my great learnings in creating sharper pictures, I always thought that using f/16 or f/22 was what landscape photographers did. But using a wider aperture and good focus technique will actually produce better results. That doesn't mean to avoid using f/16 or f/22, sometimes you have no other option but just be aware of the compromise you are making.
Knowing this I'd rather not be shooting at f/22 per Fig.22.
Fig.23 shows that switching to 24mm I can get the foreground rock in focus at f/11 with a HD of 1.72m and this would be my preference for such a shot. Obviously the framing has changed by going wider. It's likely that at 35mm the foreground rock was too prominent in the frame. Of course based on a theoretical diagram this is just a guess, but experience tells me 35mm is probably too long from 1m away!
One last observation is that to maximise my depth of field, I'm not focusing on an object and certainly not on the foreground rock. I need to focus beyond the rock, relying on the near limit of my depth of field to keep it acceptably sharp. As I said at the start this is the foundation for the "focus 1/3 in". However knowing and using your hyperfocal distances allows you to set this much more precisely and so also use an optimal rather than "safe" aperture for maximum sharpness.
I hope this post has been helpful in enhancing your understanding of some of the concepts of focus. I'd be really interested to hear your thoughts or questions in the comments. If you spot an error (lots of diagrams, lots of numbers, lots of concepts, so almost certain!) please do give me a shout so that I can update the post. Thanks!
